ESDEP WG 15A
STRUCTURAL SYSTEMS: OFFSHORE
To present methods for the design of large tubular joints typically found on offshore structures.
Lecture 15A.1: Offshore Structures: General Introduction
Lecture 15A.8 : Fabrication
Lecture 15A.12: Connections in Offshore Deck Structures
The lecture defines the principle terms and ratios used in tubular joint design. It presents the classifications for T, Y, X, N, K and KT joints and discusses the significance of gaps, overlaps, multiplanar joints and the details of joint arrangements. It describes design methods for static and fatigue strength, presenting some detailed information on stress concentration factors.
The main structure of a topside consists of either an integrated deck or a module support frame and modules. Commonly tubular lattice frames are present, however a significant amount of rolled and built up sections are also used.
This lecture refers to the design of tubular joints. These are used extensively offshore, particularly for jacket structures. Connection of I-shape sections or boxed beams whether rolled or built up, are basically similar to those used for onshore structures. Refer to the corresponding lectures for appropriate design guidance.
Two main calculations need to be performed in order to adequately design a tubular joint. These are:
The question of fatigue behaviour always has to be addressed, even where simple assessment of fatigue behaviour shows this will not be a problem. The joint designer must therefore always be "fatigue minded".
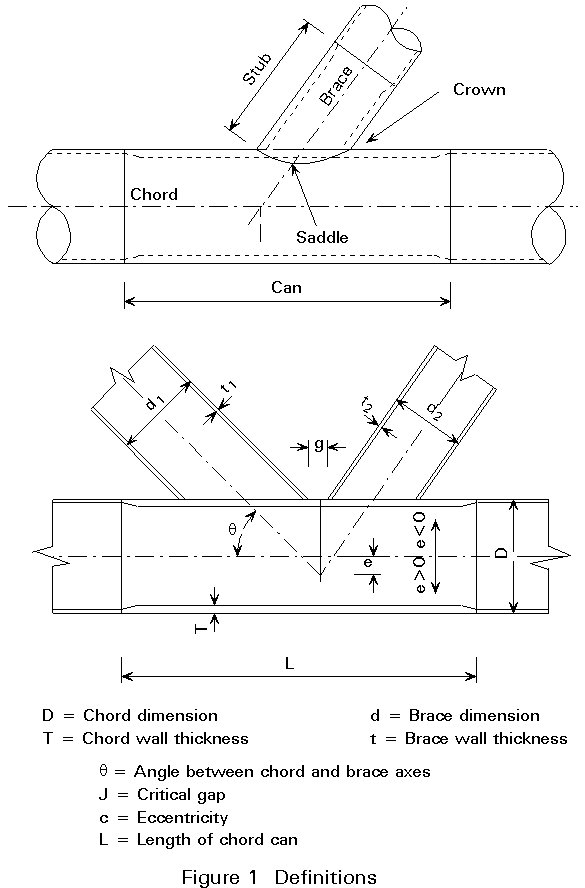
The following definitions are universally acknowledged [1]: (refer to Figure 1 for clarification):

The CHORD is the main member, receiving the other components. It is necessarily a through member. The other tubulars are welded to it, without piercing through the chord at the intersection.
Other tubulars belonging to the joint assembly may be as large as the chord, but they can never be larger.
The CAN is the section of the chord reinforced with an increased wall thickness, or stiffeners.
The BRACES are the structural members which are welded to the chord. They physically terminate on the chord skin.
The STUB is the extremity of the brace, locally reinforced with an increased wall thickness.
Different positions have to be identified along the brace - chord intersection line:
Refer to Figure 1
L is the length of the chord can
D is the chord outside diameter
T is the chord wall thickness
d is the brace outside diameter
t is the brace wall thickness (where there are several braces, a subscript identifies the brace)
g is the theoretical gap between weld toes
e is the eccentricity × Positive when opposite to the brace side, Negative when on the brace side
q
is the angle between brace and chord axis.a
=b
=g
=t
=z
=These are non-dimensional variables for use in parametrical equations.
Load paths within a joint are very different, according to the joint geometry. The following classification is used, see Figure 2.
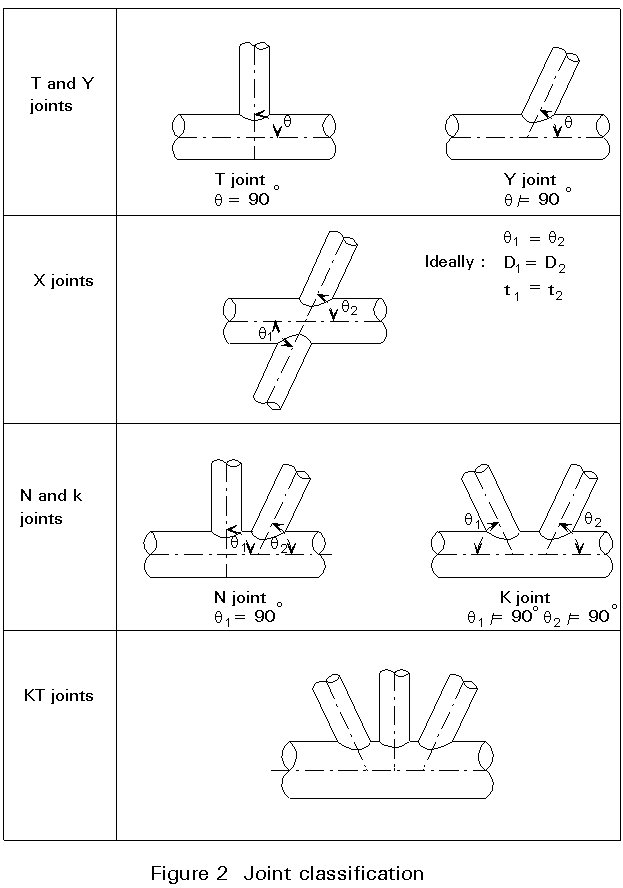
These are joints made up of a single brace, perpendicular to the chord (T joint) or inclined to it (Y joints).
In a T joint, the axial force acting in the brace is reacted by bending in the chord.
In a Y joint, the axial force is reacted by bending and axial force in the chord.
X joints include two coaxial braces on either side of the chord.
Axial forces are balanced in the braces, which in an ideal X joint have the same diameter and thickness. In fact, other considerations such as brace length, which can be very different on each side of the chord, may lead to two slightly different braces. Angles may be slightly different as well.
The important point to note is the balance of forces in the braces. If the axial force in one brace is far higher than the one in the other brace, the joint may be classified as a Y (or a T) joint rather than an X joint.
These joints include two braces. One of them may be perpendicular to the chord (N joint) or both inclined (K joint).
The ideal load pattern of these joints is reached when axial forces are balanced in the braces, i.e. net force into chord member is low.
These joints include three braces.
The load pattern for these joints is more complex. Ideally axial forces should be balanced within the braces, i.e. net force into chord member is low.
For a joint to be able to be fabricated and to be effective, the geometrical ratios given in Section 2.2 have limitations. Table 3.1 shows these limits and their typical ranges.
|
Parameter |
Typical range |
Limitations |
|
|
min |
max |
||
|
|
0,4 - 0,8 |
0,2 |
1 |
|
|
12 - 20 |
10 |
30 |
|
|
0,3 - 0,7 |
0,2 |
1 (2) |
|
q |
40° - 90° |
30° (3) |
90° (1) |
(1) Physical limitation
(2) Brace shall be less or equal to chord thickness (see punching shear)
(3) Angle limitation to get a correct workmanship of welds.
Table 3.1 Geometrical Limits and Typical Ranges
This classification deals only with braces located in one plane.
It must always be remembered that this classification is based on load pattern as well as the geometry. Engineering judgement must therefore be used to classify a joint. For example a geometrical K joint may be classified as.
The GAP is the distance along the chord between the weld toes of the braces (Figure 3).
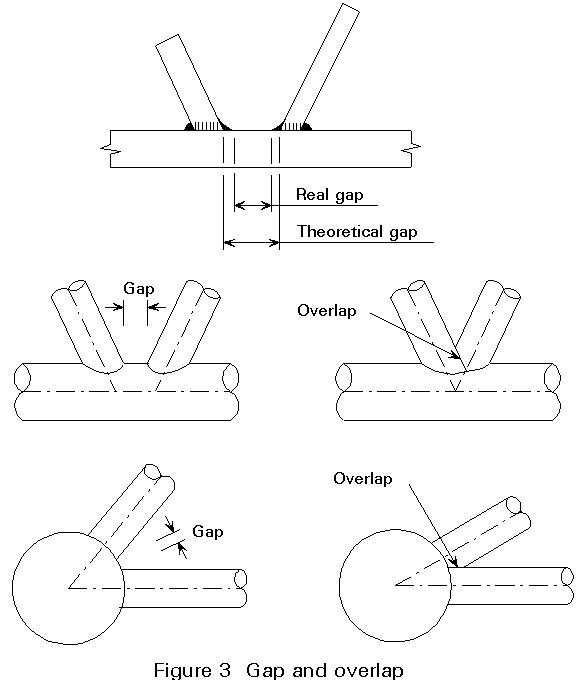
The theoretical gap is the shortest distance between the outer surfaces of two braces, measured on the line where they cross the chord outer surface. The real gap is the one measured at the corresponding location, between actual weld toes.
A brace OVERLAPS another brace when one brace is welded to the other brace.
The overlapping brace is always the thinner brace.
The overlapped brace is always completely welded to the chord.
The minimum gap allowed is 50mm. This limitation is set to avoid two welds clashing. This is important because the gap is a highly stressed zone.
The same definitions and limitations apply to multiplanar joints.
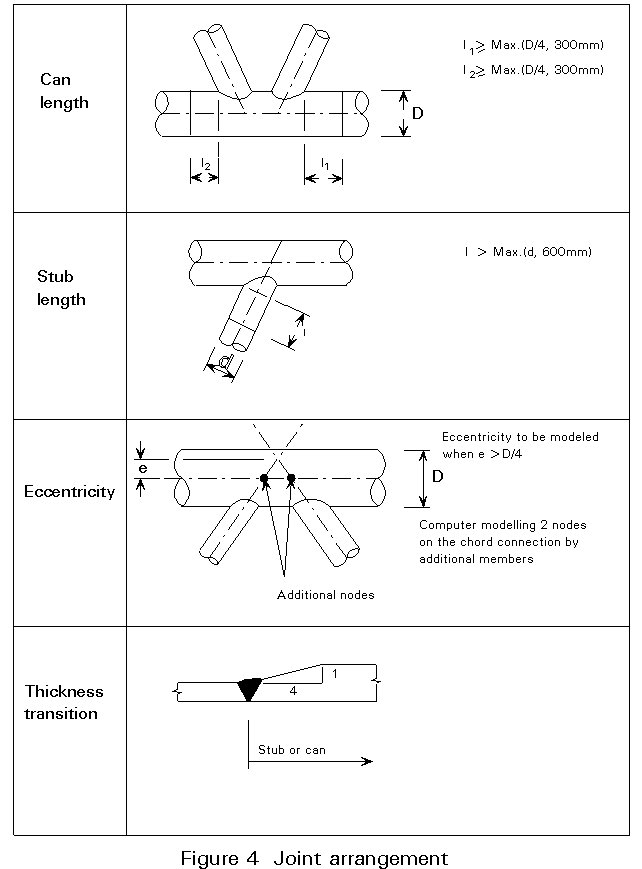
As a rule, welds in a joint have to be kept away from zones of high stress concentration.
The following practice, see Figure 4, should be followed:
The loads considered in a joint static strength design are the axial force, the in-plane bending moment and the out-of-plane bending moment for each brace.
The other components (transverse shear and brace torsion moment) are usually neglected since unlike the preceding loads, these loads do not induce bending in the chord wall. Nevertheless, their presence must never be forgotten and in some specific cases, their effects must be assessed. The axial load, in-plane and out-of-plane bending moments are normally the dimensioning criterion for tubular joints.
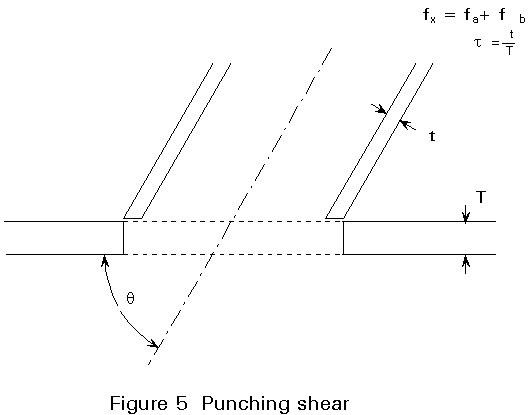
The acting punching shear is the shear stress developed in the chord by the brace load.
The acting punching stress vp is written as:
vp = t f sin q
where f is the nominal axial, in-plane bending or out-of-plane bending stress in the brace (punching shear for each kept separate), see Figure 5.
Allowable punching shear values in the chord wall are determined from test results carried out on full scale or on reduced scale models.
Tests are performed on experimental rigs such as the one shown in Figure 6. They are performed for a single load-case (axial force, in-plane bending, or out-of-plane bending).
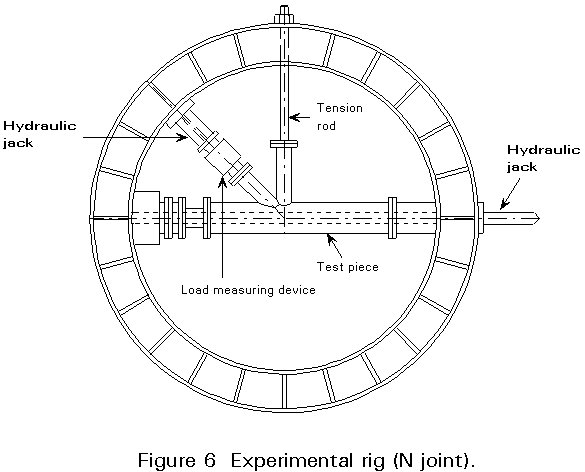
The ultimate static strength obtained through these tests can then be expressed in terms of punching shear, as defined above.
Statistical treatment of results allow formulae to be defined for the allowable punching shear stress.
Several offshore design regulations are based on the punching shear concept [1,2]. The following method is presented in API RP2A [2]:
A. Principle
B. Allowable punching shear stress
The allowable punching shear stress for each load component is:
Vpa = Qq Qf ![]()
where: Fyc is the yield strength of the chord member
Qq is to account for the effects of type of loading and geometry, see Table 6.1.
Qf is a factor to account for the nominal longitudinal stress in the chord
Qf = 1 - l g ![]()
fAX, fIPB, fOPB are the nominal axial, in-plane bending and out of plane bending stresses in the chord
Value for l and Qq are given in Table 6.1
|
Load component |
Axial load |
In-plane bending |
Out of plane bending |
|
|
Stress in brace |
fax |
fby |
fbz |
|
|
Acting punching shear |
Vpx = t fax sin q |
Vp = t fby sin q |
Vp = t fbz sin q |
|
|
|
K joints |
|
|
|
|
T & Y Joints |
|
|
|
|
|
w/o diaphragm X
w diaphragm |
Tension Compression
|
|||
|
l |
0,030 |
0,045 |
0,021 |
|
Table 6.1 Values of Qq for allowable punching shear stress from APIRP2A
Qg = 1,8 - 0,1 ![]() for g £ 20
for g £ 20
Qg = 1,4 - 4 g/D for g > 20
but Qg must be ³ 1,0
Qb = ![]() for b > 0,6
for b > 0,6
QB = 1,0 for b £ 0,6
C. Loading Combination
For combined loadings involving more than one load component, the following equations shall be satisfied:

where: IPB refers to in-plane bending component
OPB refers to out-of-plane bending component
AX refers to axial force component
and
![]() ax
ax 
where: arc sin term is in radians.
The parametric formulae discussed in Section 6.2 were specifically established for non-overlapping joints with no internal reinforcement. These formulae cannot be used for overlapping joints.
In an overlapping joint, part of the load is transferred directly from one brace to the other through the overlapping section, without that part of the load transferring through the chord. The static strength of an overlapping joint is higher than a similar joint without an overlap.
API RP2A, [2] allows the static shear strength of the overlapping weld section to be added to the punching shear capacity of the brace-chord connection, see Figure 7.
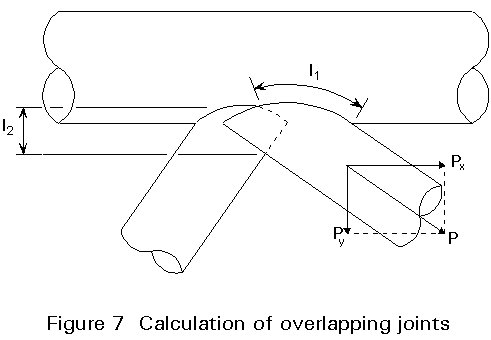
The allowable axial load component perpendicular to the chord, P^ (in Newtons) should be taken to be:
P^ = (vpa T l1) + (2vwa tw l2)
where:
vpa is the allowable punching shear stress (MPa) for axial stress.
l1 is the circumference for that portion of the brace which contacts the chord (mm), see Figure 7.
vwa is the allowable shear stress for weld between braces (MPa).
tw is the lesser of the weld throat thickness or the thickness t of the inner brace (mm).
l2 is the projected chord length (one side) of the overlapping weld, measured perpendicular to the chord (mm), see Figure 7.
Large chord wall thickness may be reduced by stiffening the chord. The most usual reinforcement consists of ring stiffening inside the chord.
Some joints may require more complex stiffening. This is the case for large diameter chords which would otherwise require an un-economic chord wall thickness.
There are very many different stiffening solutions for a large diameter chord. Therefore there are no parametric formulae available for these designs. Specific analyses must therefore be carried out for an accurate solution. This may involve finite element analysis.
Ring stiffening consists of ring plates welded in the chord can prior to welding the braces to it.
The punching shear capacity of the chord still may be taken into account when calculating the forces acting on the stiffeners.
Ring stiffeners can be justified through parametric formulae available in various publications, the best known being published by Roark [3].
As in any mechanical body presenting discontinuities, stresses are not uniform along the connecting surface of a brace and chord. Figure 8 shows an example of the stress distribution in a joint with local discontinuities at and in the vicinity of the brace chord intersection.
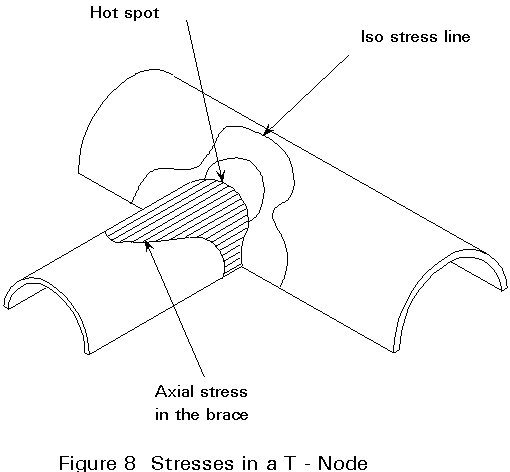
The stress concentration factor (SCF) is defined as the ratio of the highest stress in the connection (or hot spot stress fHS) to the nominal brace stress fNOM:
SCF = fHS/fNOM
This approximate formula can be used for rapidly assessing SCF, for preliminary analyses.
fHS/vp = 1,8 √g
vp being the punching shear.
SCF parametric formulae have been determined based on a large number of finite element analyses and cross-checked with either full scale or model tests. They are based on many man years of work by numerous research teams.
A large number of parametric formulae have been published [4]. Sections 7.3.1 to 7.3.3 give, as an example, the most commonly used and acknowledged formulae.
In using any set of formulae, care should be taken in classifying the situation and ascertaining any limitations that apply.
The only alternatives to these formulae are to perform model tests (full size or at reduced scale) or finite element analyses.
No parametric formulae are presently available for stiffened joints. The only ones published to date concern non-stiffened, non overlapping joints.
Axial load
SCFCHORD = 1,981 g0,808 t1,333 exp(-1,2b3 a0,057 sin1,694 q
SCFBRACE = 3,751 g0,55 texp(-1,35b 3) a0,12 sin1,94 q
Out-of-plane bending
SCFCHORD = 1,024 g1,014 t0,889 b0,787 sin1,557 q 0,3 £ b £ 0,55
SCFCHORD = 0,462 g1,014 t0,889 b(-0,619) sin1,557 q 0,55 £ b £ 0,75
SCFBRACE = 1,522 g0,852 t0,543 b0,801 sin2,033 q 0,3 £ b £ 0,55
SCFBRACE = 0,796 g0,852 t0,543 b(-0,281) sin2,033 q 0,55 £ b £ 0,75
In-plane bending
SCFCHORD = 0,702 g0,60 t0,86 b(-0,04) sin0,57 q
SCFBRACE = 1,301 g0,23 t0,38 b(-0,38) sin0,21 q
Balanced axial load
SCFCHORD = 1,506 g0,666 t1,104 b(-0,059) (g/D)0,067 sin1,521 q
SCFBRACE = 0,92 g0,157 t0,56 b(-0,441) (g/D)0,058 Exp(1,448 sin q )
In-plane bending (bending moment applied to one brace only)
SCFCHORD = 1,822 g0,38 t0,94 b0,06 sin0,9 q
SCFBRACE = 2,827 t0,35 b-0,35 sin0,5 q
Balanced axial load Outer braces only loaded
SCFCHORD = 1,83 g0,54 t1,068 b0,12 sin q 0° < q £ 90°
SCFBRACE = 6,06 g0,1 t0,68 b-0,36 {(g1+g2)/D}0,126 sin0,5 q 0° < q ³ 45°
SCFBRACE = 13,8 g0,1 t0,68 b-0,36 {(g1+g2)/D}0,126 sin2,88 q 45° £ q ³ 90°
SCFBRACE = 4,89 g0,123 t0,672 b-0,396 {(g1+g2)/D}0,159 sin2,267 q
In-plane bending - as for K joint
Validity range
The above equation for T/Y, K and KT joints are generally valid for joint parameters within the following limits:
8,333 £ g £ 33,3
0,20 £ t £ 0,8
0,3 £ b £ 0,8 unless stated otherwise
6,667 £ a £ 40 unless stated otherwise
0° £ s £ 90° unless stated otherwise.
A fatigue analysis of a joint consists of the following steps:
Nominal stress ranges in braces and chords are calculated by a global stress analyses.
A wave histogram has to be obtained for each direction around the platform. A simple form of a wave histogram is as follows:
|
Wave height (metres) |
Average number per year |
|
0-1,5 1,5-3 3-4,5 4,5-6 6-8 8-10 |
3 100 000 410 000 730 000 5 000 800 20 |
Nominal stress ranges can be calculated by following the steps below:
Hot spot stress ranges are then evaluated for each chosen joint location by applying parametric formulae [4] (or by applying the SCF calculated from a detailed analysis).
When using parametric formulae, stress components (axial, in plane bending and out of plane bending) have to be distinct throughout the calculations, as the SCF formulae apply individually for each load component.
Where a chord and brace intersect, four to eight locations are usually chosen around the intersection line. For each of these locations the stress response for each sea state should be computed, giving adequate consideration to both global and local stress effects.
S-N curves to be used for offshore structures are given by statutory regulations [1,2]. APIRP2A uses the curves shown in Figure 9.
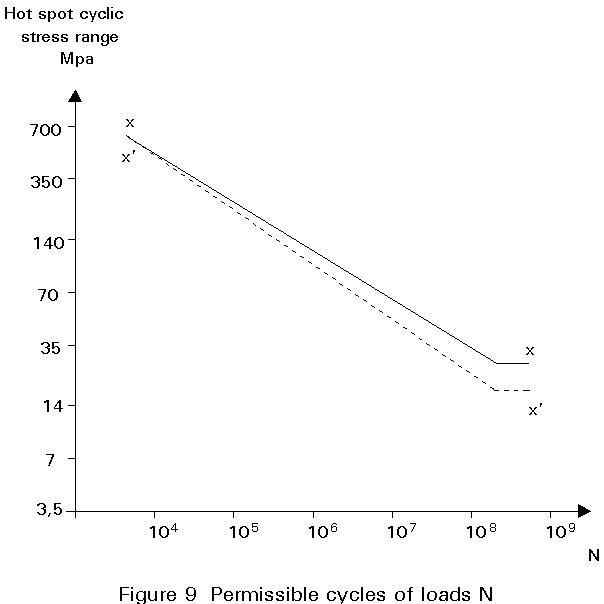
The X and X1 curves should be used with hot spot stress ranges based on suitable stress concentration factors. The permissible number of cycles is obtained from the S-N curve by taking the hot spot stress range, and entering the graph.
It should be noted that Curve X presumes welds which merge smoothly with the adjoining base metal. For weld without such profile control, the X¢ curve is applicable.
The stress responses should be combined into the long term stress distribution, which should then be used to calculate the cumulative fatigue damage ratio, D, given by:
D = ![]()
where
n is the number of cycles applied at a given stress range
N is the number of cycles to cause failure for the given stress range (obtained from appropriate S-N curve).
In general the design fatigue life of each joint and member should be at least twice the intended service life of the structure, i.e. a safety factor of 2,0.
For critical elements whose sole failure would be catastrophic, use of a larger safety factor should be considered.
[1] Offshore Installations: Guidance on Design, Construction and Certification. Fourth Edition, HMSO, 1990.
[2] Recommended Practice for Planning, Designing and Constructing Fixed Offshore Platforms, API RP2A Nineteenth Edition.
[3] Young, Warren C, Roark's Formulae for Stress and Strain. Sixth Edition, McGraw-Hill.
[4] Stress Concentration Factors for Simple Tubular Joints, 1989, Volumes 1 to 5, Lloyds Register of Shipping-Offshore Division.